Update: I just saw that Bluehost has a special August 2016 offer to host your own blog for just $2.95/month for 12 months.
In this post, I will show you how to start a food blog in five easy steps. I have been getting so many request lately, mainly from Instagrammers seeking to start their own food blog. Let me start by saying that starting a food blog is not rocket science, and it is actually the easiest part of being a blogger. When I started this blog a year ago, I had absolutely no clue what hosting, WordPress, themes or plugins were. Seriously, I did not have any experience with the technical part of blogging. After gaining a basic understanding of how to approach my blog idea, I spent many hours and nights searching for the right host, theme and plugins. So in this tutorial, I will show you how to start your own food blog in just a few steps.
- Domain and availability: This may seem trivial, but I spent many weeks brainstorming for the perfect name. If you choose Bluehost as your host then registering your domain is free. Other hosts may charge you an annual fee of 15 – 20 Euros. If you have come up with a name, check if it is still available by simply typing it into your browser.
- Web-Hosting: A web host stores your data and makes your blog visible for users on the Internet. Basically, you are renting a space on their server that contains all of your data. This may sound strange, but it is actually pretty easy. Just be aware that servers crash, so don’t forget to make back-ups at least weekly. I use Bluehost as my host, and I have never had any problems with it. In fact, I totally recommend it, because it is user friendly and affordable. Bluehost costs me $3.95 a month, which is less than you would usually spend on coffee per day.
- Install WordPress: WordPress is sort of like a “Blogging Software”. It is basically the raw framework of your blog.
- Give it personality: Themes make the raw WordPress software look pretty. It’s basically the design of your blog.
- Install Plugins: Plugins add basic functions, like sharing buttons, spam-filter or recipe editors to your blog. Most of them are free, but some have extended paid content.
That’s it. But you probably need a bit more information, don’t you? Luckily, there is a more thorough description of the set up process below.
-
Domain name & Availability
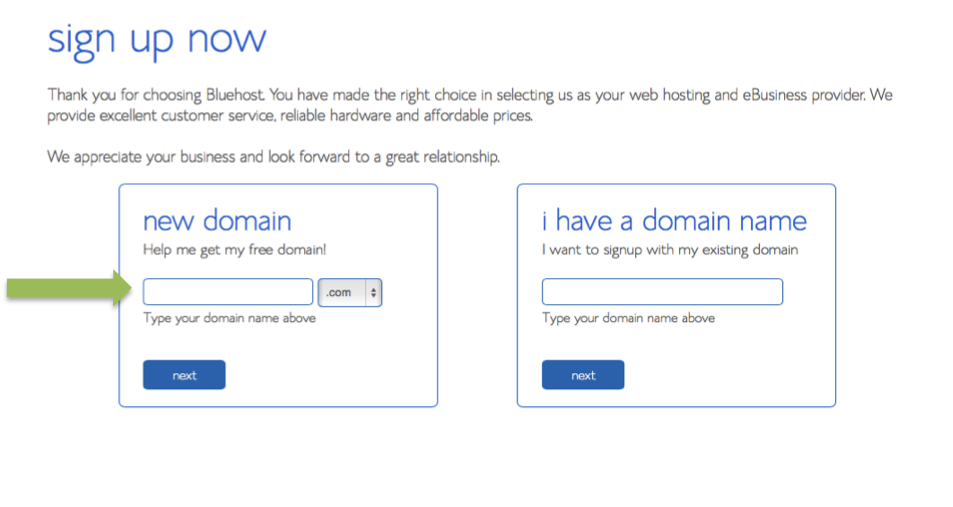
Think of a name that you identify with, and that is easy to remember. However, I didn’t listen to that advice, and my blog is still being found by others. Once you’ve come up with a name, check if it is still available by either typing it into your browser or bluehost domain registration form.
-
Web-Hosting
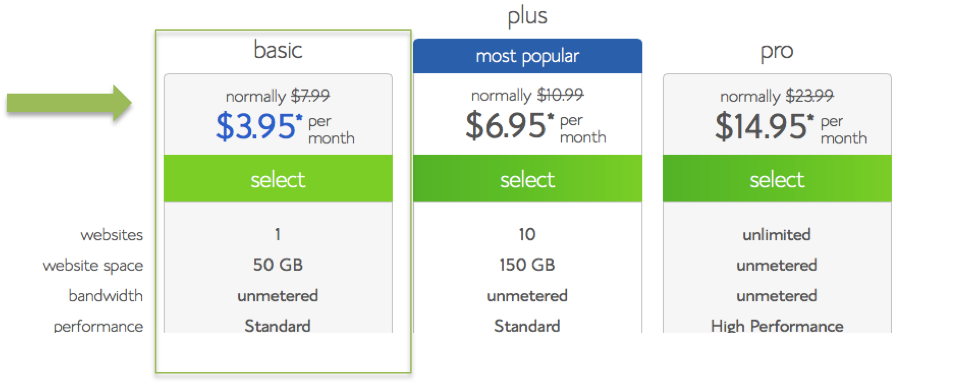
Choose a plan. I chose the basic plan for $3.95/month. So far it has never disappointed me. The only down side is that you have to sign up for a 36 months plan, hence the low monthly cost.
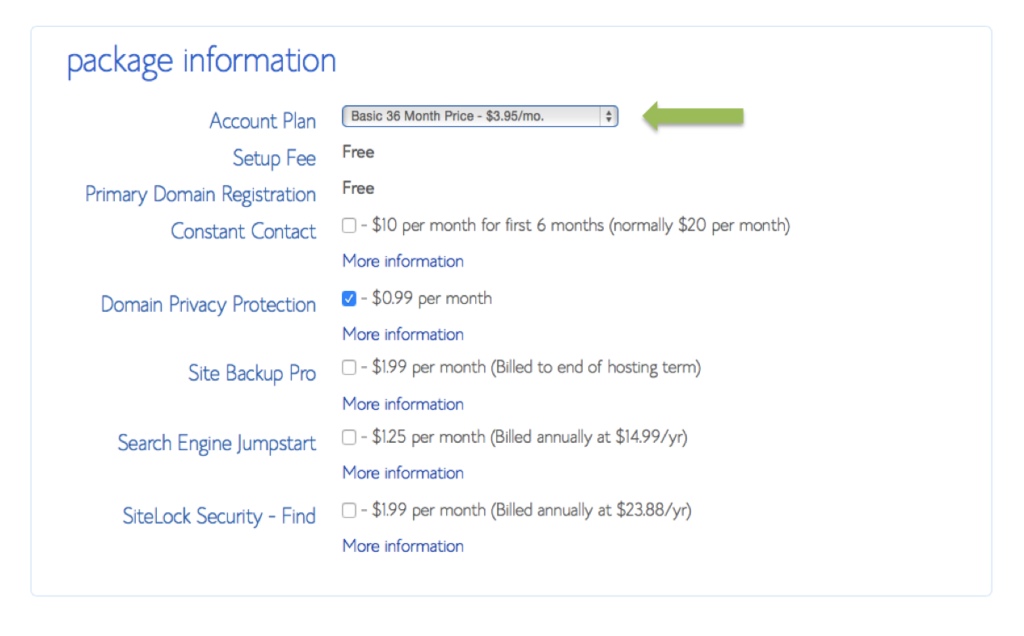
 Choose additional packages. I only chose the $0.99 Domain Privacy Protection, which keeps my personal information private.
 Now that you’ve registered your domain, and set up your web hosting account, you need to install WordPress.
 -
Installing WordPress
WordPress is the Blogging software that I have been using, and it’s honestly the best open source software that I know. Ok, I may not know a lot of them, but WordPress is super easy to work with, and very intuitive. And it’s free, so win win.
Log into your Bluehost account and find the website builder on your cpanel. Click on it to install wordpress.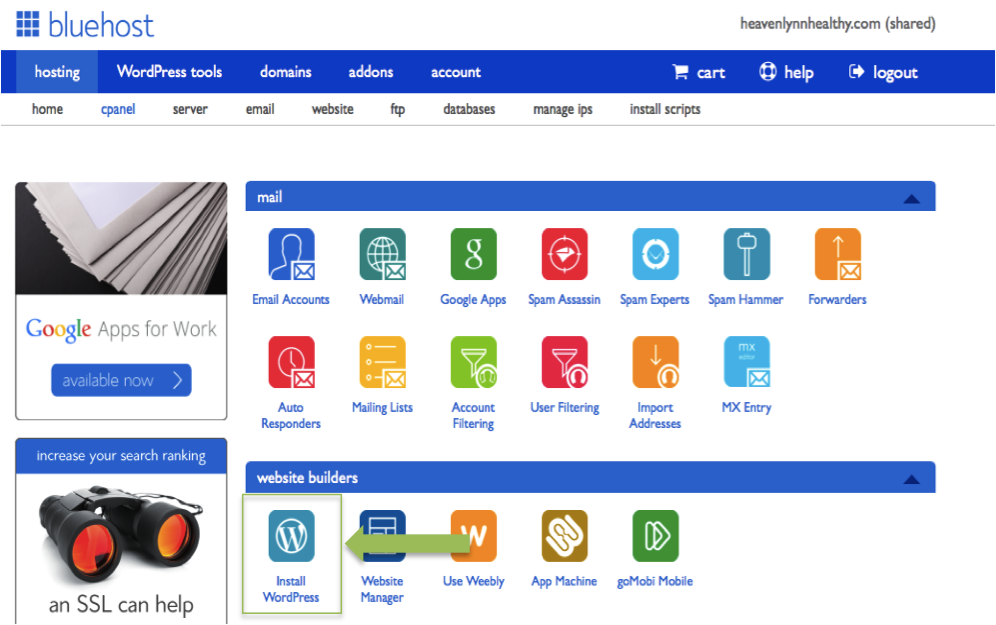
Now obviously, there is a service that helps you with the installation of WordPress, but you do not need to pay for it, because it is really easy to install it yourself.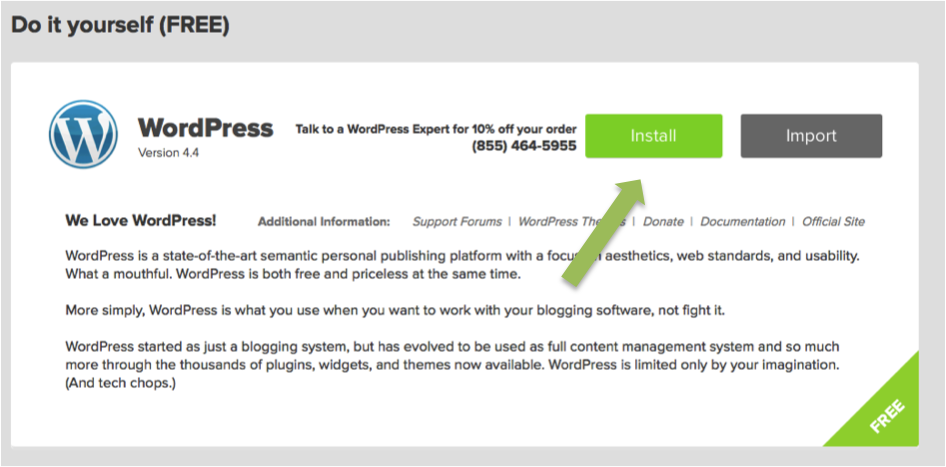
Next, type in your chosen domain name, and click on “Check Domain”.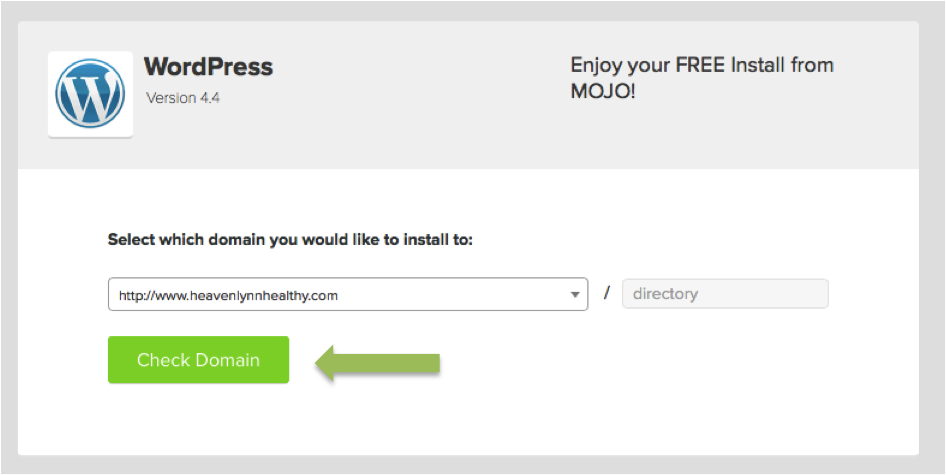
Next, check the “I have read the terms and conditions” box, and click on the “Install Now” button.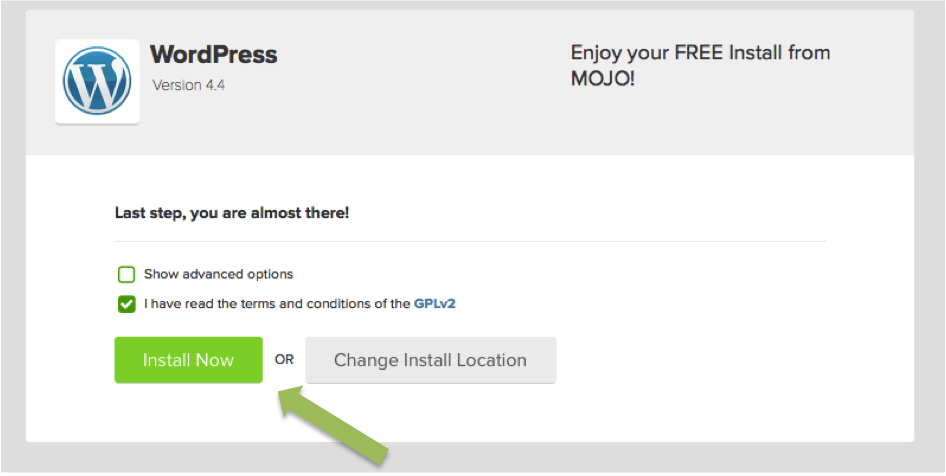
Once, you’ve completed the installation, you should get a message saying “Your install is complete” (YAY!). Click on the “View Credentials” button in the upper right corner of the screen. You’ll need this information to log into your WordPress account for the first time. It’s best if you note them somewhere, because they are not very memorable, and should be changed once you login to your wordpress account for the first time.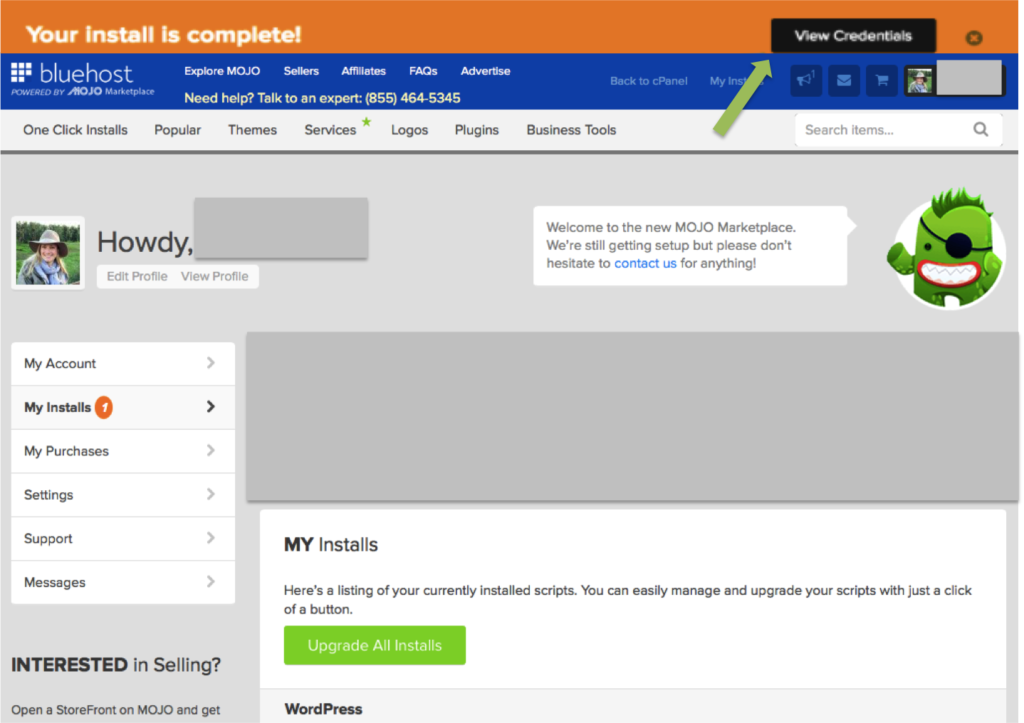
Now you need to copy and paste your admin URL into your web browser. Hit enter, and you should see a login window like mine. Type in your username and password (from the step above). And you should be good to go.
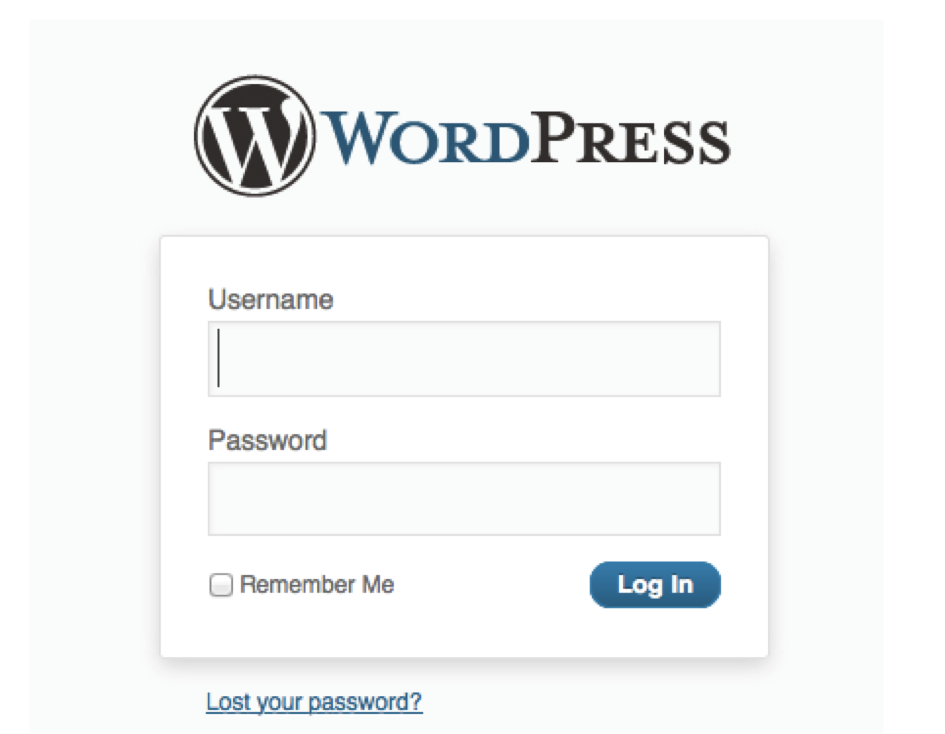
That’s it! You’ve successfully installed WordPress! Easy, right? Do you know what this means? It means that you’re now officially the owner of your very own personal blog. Congratulations! -
Give it Personality
Now, the next step is the fun part: you need to make your blog look pretty. I’ve scrolled through a few free WordPress themes for you. There’s hundreds of them, and if you don’t want to spend a lot of money on looks, the free WordPress themes are great for you. Here are some of my favorites (though I can’t vouch for their usability, I just like their looks):
- Activello: Clean, modern chick free WordPress theme.
- Olsen Light: A very chick WordPress theme, that works great for fashion or lifestyle, and probably also food.
- Nisarg: Another interesting and pretty theme. It’s maybe not the newest of themes, but fine for a low budget start.
If you are willing to spend a little more money, there is a great variety of customized themes for different kinds of blogs. I recommend looking for a theme with a recipe index, if you want to start a food blog.
- Genesis Framework Theme: This theme is sleek, modern, and very popular theme for every kind of blog.
- Foodie Pro Theme: This is the theme that I use and that I absolutely love.
- Glam Pro Theme: I recently found this theme and love love love it. Thinking of making a change actually…
- You can find tons of themes on Studiopress.com. They offer basic, free themes, and more expensive themes with advanced functions.
-
Install Plugins
Here are some of my must-have plugins:
- Askismet: My favorite spam filtering plugin. Once you start your blog, you will get tons of unwanted spam comments, and Askismet filters most of them in your spam folder.
- WordPressSEO by Yoast: SEO (search engine optimization) is very important if you want your blog to be found in search engines like Google or Yahoo. Yoast guides you through optimizing your blog in just a few steps.
- EasyRecipe: A super elegant and easy to use recipe plugin that makes all of your recipes look alike, printable and Pinterest friendly.
Now, that’s basically all you need to start writing your first post. Let me know once you have, I’m can’t wait to see you guys follow your passion!
Additional helpful tools for (food) bloggers.
Food Photography:
- „Tasty Food Photography“ by Lyndsey from PinchofYum contains everything you’ve always wanted to know about food photography from the right camera to artificial lighting. It’s been a real helper, and I couldn’t recommend it more.
- I am also a proud member of “Food Blogger Pro“, an online community for food bloggers by Bjork and Lyndsey from PinchofYum. It costs a little money per month, but all the videos, tools, and helpful tips are totally worth it. There’s a waiting list, so if you’re interested, be sure to sign up to the list in order to be notified when registration will be open again.
Social Media Tools
Tailwind:
I use Tailwind to schedule my Pins. It’s my newest find, and I am absolutely loving it. My repins have tripped ever since I started using it. It also saves me so much time, which is why it is definitely worth every penny.
Mailchimp:
I use Mailchimp for my Email-and Newsletter management. It’s completely free if you’re under 2000 subsribers, which is awesome! Unfortunately I am way past the 2000 subscribers, so I pay a significant amount of money now, but it’s definitely worth it, because my emails do not end up in my subscriber’s spam list.
That’s it for now, I hope I’ve inspired you to stop thinking about what it would be like to have your own food blog, and instead start setting up your blog today.
*This page contains affiliate links, that means, if you purchase something through my links, I get a little commission that allows me to spend hours in the Heavenlynn Healthy kitchen testing new recipes. The price is the same whether you buy it through my links or open a new browser tab and search for it in manually. Thank you for supporting Heavenlynn Healthy.
thank you for the post, you put it all together really well 🙂 a question: what plugin do you use for translating your blog, if is a plugin?
thank you :)I do not use a plugin but I keep two different websites with different URLs for translation.
Best,
Lynn
ah, that was one of my theories 🙂 thank you for answering.